Difference between revisions of "Гайд по созданию кораблей"
(translating vol2) |
|||
| (36 intermediate revisions by 5 users not shown) | |||
| Line 1: | Line 1: | ||
{{Otherlang2 | {{Otherlang2 | ||
| | |ru=Гайд создания корабля | ||
}} | }} | ||
== | == пролог == | ||
Этот гайд - введение в постройку кораблей в | Этот гайд - введение в постройку кораблей в Старбэйз. Он поможет вам понять базовые принципы в постройке каркаса корабля, его основных электронных компонентов и механизмов. | ||
== | == краткая памятка перед тем как начать == | ||
*Вам следует знать основы в конфигурации электроники и | *Вам следует знать основы в конфигурации электроники и йололе в Старбэйз, так как этот гайд включаем себя электронные компоненты и механизмы. | ||
*Вам следует знать основы кораблестроения в Дизайнере Кораблей перед тем как браться за постройку. | *Вам следует знать основы кораблестроения в Дизайнере Кораблей перед тем как браться за постройку. | ||
*Дизайнер Кораблей: заготовки чертежей, туториалы, стартовый корабль для туториала | *Дизайнер Кораблей: заготовки чертежей, туториалы, стартовый корабль для туториала | ||
| Line 13: | Line 13: | ||
Каждому кораблю требуются следующие вещи чтобы летать: | Каждому кораблю требуются следующие вещи чтобы летать: | ||
* | *Правильный каркас | ||
*Ускорители | *Ускорители | ||
*Источник электроэнергии: Генератор или Батареи | *Источник электроэнергии: Генератор или Батареи | ||
| Line 21: | Line 21: | ||
*Устройства управления кораблем и базовая конфигурация | *Устройства управления кораблем и базовая конфигурация | ||
== | == Правильный каркас == | ||
*Все корабли должны быть построены с учетом законов стойкости чтобы иметь возможность летать не разрушаясь. | *Все корабли должны быть построены с учетом законов стойкости чтобы иметь возможность летать не разрушаясь. | ||
**Основы законов стойкости каркаса - структура балок собирающихся в каркас корабля и всему остальному что к ним прикреплено. | **Основы законов стойкости каркаса - структура балок собирающихся в каркас корабля и всему остальному что к ним прикреплено. | ||
* | *Правильный каркас состоит из балок соедененных друг с другом с помощью соедененительных пластин и болтов, а правильное крепление для ускорителя - прикреплено напрямую к каркасу. | ||
**Крепление должны быть прикреплено к каркасу как минимум двумя болтами, и сам ускоритель должен быть прикреплен к креплению напрямую. | **Крепление должны быть прикреплено к каркасу как минимум двумя болтами, и сам ускоритель должен быть прикреплен к креплению напрямую. | ||
**Ускоритель должен быть правильно установлен на крепление, чтобы порты Информационной сети на ускорителе и на креплении встали друг в друга и были подключены к тому же каркасу. | **Ускоритель должен быть правильно установлен на крепление, чтобы порты Информационной сети на ускорителе и на креплении встали друг в друга и были подключены к тому же каркасу. | ||
*Каркас корабля должен быть последовательным, не стоит | *Каркас корабля должен быть последовательным, не стоит соеденять два разных каркаса между собой. | ||
**Если в корабле будет два каркаса, больший будет использован. | **Если в корабле будет два каркаса, больший будет использован. | ||
<gallery widths=500px heights=400px mode="nolines"> | <gallery widths=500px heights=400px mode="nolines"> | ||
| Line 42: | Line 42: | ||
=== Пластины === | === Пластины === | ||
====Внешние пластины==== | ====Внешние пластины==== | ||
*Внешние пластины защищают корабль от выстрелов, столкновений и радиации во время | *Внешние пластины защищают корабль от выстрелов, столкновений и радиации во время варпа. | ||
*Не следует оставлять дыр и зазоров в внешних пластинах, иначе радиация пройдет через них во время | *Не следует оставлять дыр и зазоров в внешних пластинах, иначе радиация пройдет через них во время варпа. Балки и пластины выдерживают простые полеты но могут быть уязвимы во время варпа если корабль не создан для этого. | ||
*Пластины | *Пластины подсоеденены к балкам с помощью болтов. | ||
====Внутренние пластины==== | ====Внутренние пластины==== | ||
*Основная разница между внутренними и внешними пластинами в материале из которого они сделаны. | *Основная разница между внутренними и внешними пластинами в материале из которого они сделаны. | ||
*Внутренние пластины не так важны в плане | *Внутренние пластины не так важны в плане крепкости и возможности летать у кораблей но значительно облегчают ходьбу внутри и помогают выдерживать огонь из орудий. | ||
*Рекомендуется иметь хотя-бы немного внутренних пластин чтобы облегчить передвижение по кораблю и сделать интерьер более приятным глазу. | *Рекомендуется иметь хотя-бы немного внутренних пластин чтобы облегчить передвижение по кораблю и сделать интерьер более приятным глазу. | ||
*Внутренние пластины так же помогают лучше выглядеть установке механизмов, электроники, кабелей и труб. | *Внутренние пластины так же помогают лучше выглядеть установке механизмов, электроники, кабелей и труб. | ||
| Line 54: | Line 54: | ||
</gallery> | </gallery> | ||
=== | === Hardpoints === | ||
* | *Thrusters and other machinery outside the ship’s hull have to be connected to the ship’s '''data network'''. | ||
* | *Thrusters also need to be connected to the ship’s '''propellant gas network.''' | ||
* | *Connecting thrusters and machinery to the spaceship networks is done with '''hardpoints'''. | ||
* | *Hardpoints have pipe and cable slots for connecting pipes and cables. This means hardpoints need to be placed on the frame so that cabling and piping can be done. | ||
*As thrusters need hardpoints to work, it is important to pay attention to where to place the hardpoints. Thruster locations greatly affect how the ship flies and how easily the ship can be maneuvered. | |||
<gallery widths=400px heights=400px mode="nolines"> | <gallery widths=400px heights=400px mode="nolines"> | ||
File:Hardpoint_example_.jpg | File:Hardpoint_example_.jpg | ||
</gallery> | </gallery> | ||
=== | === Modules === | ||
* | *Modules are plates, beams, etc. which are grouped together. The purpose of the modules is to make constructing spaceships faster and easier than using single parts. | ||
* | *Every module has at least one Parent Object (Green Sphere) that ties the objects in the module together. Modules can be moved and rotated as a whole by having green sphere selected (module icon). | ||
*''' | *'''It is highly recommended that beginners start building with modules.''' | ||
** | **Using modules should automatically ensure that the spaceship structure is correct. | ||
** | **Modules are the best way to learn the building grid and good building patterns. | ||
** | **There is a lot of different building parts in the game and this can be overwhelming at first. Using modules reduces the number of building parts you need to remember. | ||
** | **The building process will be faster and the progress is easier to notice. | ||
** | **Basic modules for smaller and medium sized ships are introduced in: Premade blueprints/Tutorials/Tutorial Starter Spaceship | ||
** | **The basic modules are for building 90 degree angles. This means the hull will have box-like appearance at first. The hull can be decorated with decoration parts and normal plates later on. <br> | ||
<gallery widths=800px heights=900px mode="nolines"> | <gallery widths=800px heights=900px mode="nolines"> | ||
File:Basic_starter_set_modules_guide_picture.jpg | File:Basic_starter_set_modules_guide_picture.jpg | ||
</gallery> | </gallery> | ||
=== | === The Grid === | ||
* | *Spaceship modules use a 48 cm grid. This is because the basic hull thickness is 48 cm. | ||
* | *Outer plating (12 cm) + beam frame (24 cm) + inner plating (12 cm) = 48 cm | ||
* | *Keeping the hull structure in the grid ensures that beams connect easily. | ||
<gallery widths=400px heights=400px mode="nolines"> | <gallery widths=400px heights=400px mode="nolines"> | ||
File:Grid_example.jpg | File:Grid_example.jpg | ||
</gallery> | </gallery> | ||
=== | === Bolting And Durability === | ||
* | *Each part of the ship has its own mass. In durability calculations, the mass of different parts is transferred towards the frame via connections (bolts) and other parts. This means parts close to the frame need to support all the parts further away from the frame. | ||
* | *When building your first spaceship, it is good to do test bolting and durability checks in the middle of the building process. This way you can avoid unnecessary extra work and keep the hull structure consistent all the time. | ||
*Durability Tool will report '''No ship frame''' when there are no thruster bases with connected thrusters connected to the frame. When there is at least one thruster properly connected to the thruster base and both are connected to the frame with bolts, Durability Tool will show '''Ship Warp Class X'''. If the ship warp class is lower than one, it means there are parts which are poorly connected to the frame. | |||
*When the Durability Tool shows warp class for the ship, it also means that '''a frame integrity check''' can be done. (Durability tool→ Right mouse button). The frame integrity check basically studies how solidly each frame beam (and whatever it supports) is connected to the frame-attached thrusters. | |||
<gallery widths=400px heights=400px mode="nolines"> | <gallery widths=400px heights=400px mode="nolines"> | ||
File:Frame_integrity_check_SSC.jpg| | File:Frame_integrity_check_SSC.jpg|If the frame design is not balanced enough, certain sections may encounter too much stress. This creates a durability error for the frame beam. | ||
File:Frame_integrity_check_SSC_2.jpg| | File:Frame_integrity_check_SSC_2.jpg|This is the same spot but some attachment plates and bolts have been removed between beams. Notice the color change which means those beams are about to fail. | ||
</gallery> | </gallery> | ||
== | == Thrusters == | ||
A spaceship needs thrusters to be able to fly and thrusters need to be bolted to the hull. | |||
* | *Thrusters can be divided to two types: '''main thrusters''' and '''maneuver thrusters'''. Main thrusters generate forward movement and maneuver thrusters enable yaw, pitch and roll for example. Each thruster model can act as a main thruster or a maneuver thruster. To which movement the thruster will contribute, the defining factor is position and orientation of the thruster. | ||
* | *Location of thrusters greatly affects how easy the ship is to maneuver. For example if your ship is missing forward facing thrusters, your ship won’t be able to fly backwards. | ||
* | *Mass is also a factor when placing thrusters to your spaceship. Each beam, plate and machinery you have placed on your ship has mass. The bigger your ship is, more thrust it will need. | ||
* | *Thrusters need '''electricity''' and '''propellant''' to work. Thrusters consume more propellant than power. This means civilian ships without weaponry can have smaller generators and mainly focus on propellant containers. | ||
''' | '''Maneuver thrusters''' | ||
* | *Maneuver thrusters are usually smaller and don’t need to provide much thrust. | ||
* | *There are three sizes of thrusters in Starbase: box thruster, triangle thruster and maneuver thruster. Each thruster can be used as a maneuver thruster even thought only one is named a ”maneuver thruster”. | ||
''' | '''Main thrusters''' | ||
* | *Main thrusters are usually the thrusters that are facing backwards as this enables forward movement for the ship. | ||
Maneuver thruster | |||
* | *Max thrust: 50 000 | ||
* | *The small maneuver thruster is placed on a hardpoint | ||
Box thruster | |||
* | *Max thrust: 500 000 | ||
* | *The box thruster is connected to a hardpoint from the side and this thruster can’t be stacked | ||
Triangle thruster | |||
* | *Max thrust: 300 000 | ||
* | *The biggest difference the triangle thruster has compared to the other two thrusters is that it can be stacked. Only one triangle thruster needs connection with a hardpoint and more triangle thrusters can be connected to that thruster. Stacked triangle thrusters share same device field name which is linked to MFC and operate as a whole. | ||
== | == Power Source == | ||
Machines and devices need power in spaceships. Power can be provided with generator or batteries | |||
=== | === Generator === | ||
Generator pieces are modular and can be used to build bigger and smaller generators. <br> | |||
Working generator will need at least one '''generator fuel chamber''', one '''small fuelrod,''' one '''generator unit''', one '''generator socket board''', one '''generator cooling rack''' and one '''small cooling cell'''. | |||
* | *Place the generator in a way that there is enough room to pull out the fuel rod | ||
* | *Also make sure there is an easy access to the socket board and to the coolant cells. | ||
* | *The generator parts need to be bolted together and the generator needs to be bolted to the ship. | ||
* | *Generator cooling can also provided by using Radiator | ||
<gallery widths=400px heights=400px mode="nolines"> | <gallery widths=400px heights=400px mode="nolines"> | ||
| Line 149: | Line 151: | ||
</gallery> | </gallery> | ||
== | == Propellant == | ||
Thrusters need and consume propellant to work. Propellant is stored in propellant containers. The amount of containers spaceship will need depends on how many thrusters it has. | |||
* | *There are three sizes of propellant containers: small, medium and large. | ||
* | *While placing the propellant containers make sure there is an access to at least two of the sockets found in the tank support. | ||
* | *The propellant container needs to be bolted to the ship. | ||
== | == Data Network == | ||
The spaceship needs a cable network to transfer electricity to all the machinery and data between all the devices. | |||
* | *Use the cabling tool to connect all the machinery and devices to the same network. | ||
* | *Make sure that all the devices and machinery: thrusters, doors, MCU, FCU, levers, lamps and buttons are connected to the network. | ||
<gallery widths=800px heights=800px mode="nolines"> | <gallery widths=800px heights=800px mode="nolines"> | ||
File:Data_network_example.jpg | File:Data_network_example.jpg | ||
| Line 166: | Line 168: | ||
</gallery> | </gallery> | ||
== | == Pipe Network For Propellant == | ||
The spaceship needs a pipe network to transfer propellant to all thrusters from propellant containers. | |||
* | *Use [[Pipe tool]] to connect all propellant containers and hardpoints with thrusters. | ||
* | *To get information from propellant network, containers also need to be in electricity network. Connecting one propellant container support to electricity network can be used to show the total amount of propellant in the pipe network. | ||
<gallery widths=800px heights=800px mode="nolines"> | <gallery widths=800px heights=800px mode="nolines"> | ||
File:Pipe_network_example.jpg | File:Pipe_network_example.jpg | ||
| Line 177: | Line 179: | ||
</gallery> | </gallery> | ||
== | == Ship Controls And Basic Configuration == | ||
Spaceship thrusters can be controlled directly with levers, buttons and YOLOL. However YOLOL-configured thruster balance settings and flying are very ship specific configurations. The following guide explains how to use and configure Flight Control Unit (FCU) and Main Flight Computer (MFC) to do thruster balance calculations and settings for you. | |||
* | *If you are interested about YOLOL configured thruster balance settings and flying you can examine Spaceship Vasama in the Spaceship Designer. | ||
=== | |||
===Flight Control Unit (FCU)=== | |||
*FCU | *'''The FCU''' gets input from control devices (levers and buttons) and sends it to the '''Main Flight Computer''', which forwards it to the thrusters. | ||
* | *The arrows on top of the FCU define the ”forward” direction of the ship. | ||
* | *There can be more than one FCU connected to one Main Flight Computer. | ||
* | *There are currently three FCU models in Starbase: Basic, Advanced and Premium model. Each model has a different set of ship movements available. | ||
''' | '''Basic model''': | ||
* FcuMfcIO ( | * FcuMfcIO (for connecting the MFC) | ||
* FcuInputRange ( | * FcuInputRange (Lever input range) | ||
* FcuGeneralMultiplier (" | * FcuGeneralMultiplier (a "soft power switch", scales all output) | ||
* FcuForward ( | * FcuForward (moves the ship straight forward or combines FcuFwdBwd rotations with the forward movement) | ||
* FcuBackward ( | * FcuBackward (moves the ship straight backward or combines FcuFwdBwd rotations with the backward movement) | ||
* FcuRotationalPitch ( | * FcuRotationalPitch (in-place pitch rotation) | ||
* FcuRotationalYaw ( | * FcuRotationalYaw (in-place yaw rotation) | ||
* FcuRotationalRoll ( | * FcuRotationalRoll (in-place roll rotation) | ||
''' | '''Advanced model''' (in addition to the Basic controls): | ||
* FcuUpDown ( | * FcuUpDown (moves the ship straight up or down) | ||
* FcuRightLeft ( | * FcuRightLeft (moves the ship straight right or left) | ||
''' | '''Premium model''' (in addition to the Advanced controls): | ||
* FcuFwdBwdPitch ( | * FcuFwdBwdPitch (rotation combined to forward/backward movement) | ||
* FcuFwdBwdYaw ( | * FcuFwdBwdYaw (rotation combined to forward/backward movement) | ||
* FcuFwdBwdRoll ( | * FcuFwdBwdRoll (rotation combined to forward/backward movement) | ||
[[File:FCU_and_MFC_assembly_guide.jpg|400px]] | [[File:FCU_and_MFC_assembly_guide.jpg|400px]] | ||
=== | ===Main Flight Computer (MFC)=== | ||
*''' | *'''MFC''' is placed in the same data network with a '''Flight Control Unit''' and '''thrusters'''. The MFC and FCU share one identical device field name. | ||
* | *MFC gets input from the Flight Control Unit and sends this data to the thrusters, telling them what to do. For example "pilot interacts with yaw lever". The FCU receives the information and sends it to the Main Flight Computer. The MFC then automatically decides which thursters are used to make the ship yaw. | ||
MFC | *Each thruster group is controlled by exactly one MFC. There can be several MFCs in one ship. | ||
* | |||
=== | ===Levers=== | ||
The Flight Control Unit (FCU) gets input from control devices like levers and buttons. To get the levers to work with an FCU you need to configure the lever device fields to match with the FCU device fields (see picture below). | |||
<gallery widths=600px heights=600px mode="nolines"> | <gallery widths=600px heights=600px mode="nolines"> | ||
File:Lever_fcu_assembly_example.jpg| | File:Lever_fcu_assembly_example.jpg|Examine '''FCU''' device fields and levers. Also notice matching device fields in the '''MFC''' and the '''FCU''' | ||
</gallery> | </gallery> | ||
==== | ====Lever Examples==== | ||
''' | '''Note!''' These are examples for a ship that has an FCU and an MFC. Also the FCU input Range is set to 100. | ||
<gallery widths=500px heights=500px mode="nolines"> | <gallery widths=500px heights=500px mode="nolines"> | ||
File:Lever_assembly_example_1.jpg| | File:Lever_assembly_example_1.jpg|Lever settings for '''forward thrust'''. If the FCU input range would be 1000, then LeverMaxOutput would be 1000 and LeverBindsMoveSpeed would be also higher | ||
File:Lever_assembly_example_2.jpg| | File:Lever_assembly_example_2.jpg|Centered lever settings for yaw. Notice LeverCenteringSpeed. | ||
</gallery> | </gallery> | ||
=== | ===Thruster configuration=== | ||
The Main Flight Computer controls the thrusters. One MFC can handle 50 thrusters, which means there are 50 device fields for thrusters in an MFC (thrusterPowerLevelXX). These field names are set for ship's thrusters. Field names can be renamed but each thruster should have a unique device field name (excluding stacked triangle thrusters). | |||
<gallery widths=800px heights=600px mode="nolines"> | <gallery widths=800px heights=600px mode="nolines"> | ||
File:data_network_example.jpg| | File:data_network_example.jpg| Examine the '''MFC''' device fields (thrusterpowerlevel...) and thruster device field names set to thrusters throughout the data network | ||
</gallery> | </gallery> | ||
<gallery widths=500px heights=600px mode="nolines"> | <gallery widths=500px heights=600px mode="nolines"> | ||
File:Thruster_device_field_example_01.jpg| | File:Thruster_device_field_example_01.jpg|A configured thruster: When a thruster is connected to same data network with an MFC and is given matching field name with the MFC thruster list, the values should automatically update and be the same. Also in this case '''ThrusterCurrentThrust''' field name has been changed to '''T07''' ( This can be linked to Progress Bar) | ||
</gallery> | </gallery> | ||
== | ==Troubleshooting== | ||
''' | '''Checklist''' | ||
Each spaceship needs the following things to fly: | |||
*Valid frame/Hull | |||
* | *Thrusters | ||
* | *Powersource | ||
* | *Propellant for thrusters | ||
* | *Data Network | ||
* | *Pipe network for propellant | ||
* | *Ship controls and basic configuration | ||
* | |||
''' | '''My ship is not moving?''' | ||
# | # Check durability and bolting→ Thruster hardpoints are bolted to the frame and thrusters are bolted to the hardpoints/ hull. The ship frame is consistent and bolted. | ||
# | # Thrusters need electricity and propellant → Check cabling and piping (all thruster hardpoints are connected to the electricity network and to the propellant pipe network. | ||
# | # Electricity network (cable) is connected to the generator. Check that the generator has all the necessary parts → see 3. Powersource/generator | ||
# | # Pipe network is connected to the propellant containers → see Pipe network for propellant | ||
# | # Check the thruster configuration → see thruster configuration (matching device field names and values in MFC and in thrusters '''(If the ship is using an MFC)''' | ||
# | # Check matching device field names in the MFC and FCU → see picture in Levers section | ||
# | # Check matching device field names in the levers and in the FCU → see picture in Levers section | ||
''' | '''When I start flying my ship, some pieces of the ship detach?''' | ||
* | *Use the Durability Tool. Check that everything is green and bolted. | ||
''' | '''My ship is almost symmetrical but still doesn’t fly straight/ turns easier to one direction?''' | ||
* | *Some thrusters might not be working → Check : 1 , 2, 3, 4 ,5 | ||
''' | '''All thrusters seem to working but ship yaw/pitch/roll is slow?''' | ||
* | *In some cases you might need re-position thrusters or add more thrusters. Upgrading FCU to premium model which has combined movements possibilities can also be helpful in some cases. | ||
Revision as of 10:47, 30 April 2020
пролог
Этот гайд - введение в постройку кораблей в Старбэйз. Он поможет вам понять базовые принципы в постройке каркаса корабля, его основных электронных компонентов и механизмов.
краткая памятка перед тем как начать
- Вам следует знать основы в конфигурации электроники и йололе в Старбэйз, так как этот гайд включаем себя электронные компоненты и механизмы.
- Вам следует знать основы кораблестроения в Дизайнере Кораблей перед тем как браться за постройку.
- Дизайнер Кораблей: заготовки чертежей, туториалы, стартовый корабль для туториала
Требования к кораблю
Каждому кораблю требуются следующие вещи чтобы летать:
- Правильный каркас
- Ускорители
- Источник электроэнергии: Генератор или Батареи
- Топливо
- Информационная сеть
- Сеть труб для топлива
- Устройства управления кораблем и базовая конфигурация
Правильный каркас
- Все корабли должны быть построены с учетом законов стойкости чтобы иметь возможность летать не разрушаясь.
- Основы законов стойкости каркаса - структура балок собирающихся в каркас корабля и всему остальному что к ним прикреплено.
- Правильный каркас состоит из балок соедененных друг с другом с помощью соедененительных пластин и болтов, а правильное крепление для ускорителя - прикреплено напрямую к каркасу.
- Крепление должны быть прикреплено к каркасу как минимум двумя болтами, и сам ускоритель должен быть прикреплен к креплению напрямую.
- Ускоритель должен быть правильно установлен на крепление, чтобы порты Информационной сети на ускорителе и на креплении встали друг в друга и были подключены к тому же каркасу.
- Каркас корабля должен быть последовательным, не стоит соеденять два разных каркаса между собой.
- Если в корабле будет два каркаса, больший будет использован.

Балочный каркас

Пластины
Внешние пластины
- Внешние пластины защищают корабль от выстрелов, столкновений и радиации во время варпа.
- Не следует оставлять дыр и зазоров в внешних пластинах, иначе радиация пройдет через них во время варпа. Балки и пластины выдерживают простые полеты но могут быть уязвимы во время варпа если корабль не создан для этого.
- Пластины подсоеденены к балкам с помощью болтов.
Внутренние пластины
- Основная разница между внутренними и внешними пластинами в материале из которого они сделаны.
- Внутренние пластины не так важны в плане крепкости и возможности летать у кораблей но значительно облегчают ходьбу внутри и помогают выдерживать огонь из орудий.
- Рекомендуется иметь хотя-бы немного внутренних пластин чтобы облегчить передвижение по кораблю и сделать интерьер более приятным глазу.
- Внутренние пластины так же помогают лучше выглядеть установке механизмов, электроники, кабелей и труб.

Hardpoints
- Thrusters and other machinery outside the ship’s hull have to be connected to the ship’s data network.
- Thrusters also need to be connected to the ship’s propellant gas network.
- Connecting thrusters and machinery to the spaceship networks is done with hardpoints.
- Hardpoints have pipe and cable slots for connecting pipes and cables. This means hardpoints need to be placed on the frame so that cabling and piping can be done.
- As thrusters need hardpoints to work, it is important to pay attention to where to place the hardpoints. Thruster locations greatly affect how the ship flies and how easily the ship can be maneuvered.

Modules
- Modules are plates, beams, etc. which are grouped together. The purpose of the modules is to make constructing spaceships faster and easier than using single parts.
- Every module has at least one Parent Object (Green Sphere) that ties the objects in the module together. Modules can be moved and rotated as a whole by having green sphere selected (module icon).
- It is highly recommended that beginners start building with modules.
- Using modules should automatically ensure that the spaceship structure is correct.
- Modules are the best way to learn the building grid and good building patterns.
- There is a lot of different building parts in the game and this can be overwhelming at first. Using modules reduces the number of building parts you need to remember.
- The building process will be faster and the progress is easier to notice.
- Basic modules for smaller and medium sized ships are introduced in: Premade blueprints/Tutorials/Tutorial Starter Spaceship
- The basic modules are for building 90 degree angles. This means the hull will have box-like appearance at first. The hull can be decorated with decoration parts and normal plates later on.

The Grid
- Spaceship modules use a 48 cm grid. This is because the basic hull thickness is 48 cm.
- Outer plating (12 cm) + beam frame (24 cm) + inner plating (12 cm) = 48 cm
- Keeping the hull structure in the grid ensures that beams connect easily.

Bolting And Durability
- Each part of the ship has its own mass. In durability calculations, the mass of different parts is transferred towards the frame via connections (bolts) and other parts. This means parts close to the frame need to support all the parts further away from the frame.
- When building your first spaceship, it is good to do test bolting and durability checks in the middle of the building process. This way you can avoid unnecessary extra work and keep the hull structure consistent all the time.
- Durability Tool will report No ship frame when there are no thruster bases with connected thrusters connected to the frame. When there is at least one thruster properly connected to the thruster base and both are connected to the frame with bolts, Durability Tool will show Ship Warp Class X. If the ship warp class is lower than one, it means there are parts which are poorly connected to the frame.
- When the Durability Tool shows warp class for the ship, it also means that a frame integrity check can be done. (Durability tool→ Right mouse button). The frame integrity check basically studies how solidly each frame beam (and whatever it supports) is connected to the frame-attached thrusters.
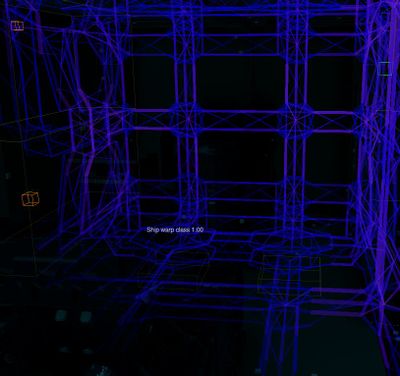
If the frame design is not balanced enough, certain sections may encounter too much stress. This creates a durability error for the frame beam.
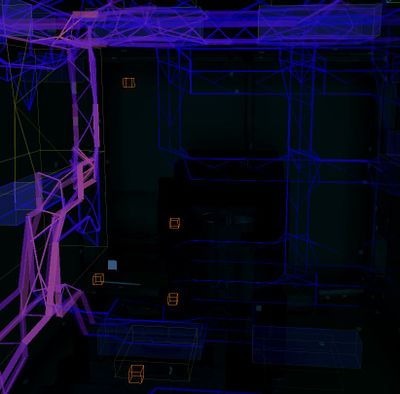
This is the same spot but some attachment plates and bolts have been removed between beams. Notice the color change which means those beams are about to fail.


Thrusters
A spaceship needs thrusters to be able to fly and thrusters need to be bolted to the hull.
- Thrusters can be divided to two types: main thrusters and maneuver thrusters. Main thrusters generate forward movement and maneuver thrusters enable yaw, pitch and roll for example. Each thruster model can act as a main thruster or a maneuver thruster. To which movement the thruster will contribute, the defining factor is position and orientation of the thruster.
- Location of thrusters greatly affects how easy the ship is to maneuver. For example if your ship is missing forward facing thrusters, your ship won’t be able to fly backwards.
- Mass is also a factor when placing thrusters to your spaceship. Each beam, plate and machinery you have placed on your ship has mass. The bigger your ship is, more thrust it will need.
- Thrusters need electricity and propellant to work. Thrusters consume more propellant than power. This means civilian ships without weaponry can have smaller generators and mainly focus on propellant containers.
Maneuver thrusters
- Maneuver thrusters are usually smaller and don’t need to provide much thrust.
- There are three sizes of thrusters in Starbase: box thruster, triangle thruster and maneuver thruster. Each thruster can be used as a maneuver thruster even thought only one is named a ”maneuver thruster”.
Main thrusters
- Main thrusters are usually the thrusters that are facing backwards as this enables forward movement for the ship.
Maneuver thruster
- Max thrust: 50 000
- The small maneuver thruster is placed on a hardpoint
Box thruster
- Max thrust: 500 000
- The box thruster is connected to a hardpoint from the side and this thruster can’t be stacked
Triangle thruster
- Max thrust: 300 000
- The biggest difference the triangle thruster has compared to the other two thrusters is that it can be stacked. Only one triangle thruster needs connection with a hardpoint and more triangle thrusters can be connected to that thruster. Stacked triangle thrusters share same device field name which is linked to MFC and operate as a whole.
Power Source
Machines and devices need power in spaceships. Power can be provided with generator or batteries
Generator
Generator pieces are modular and can be used to build bigger and smaller generators.
Working generator will need at least one generator fuel chamber, one small fuelrod, one generator unit, one generator socket board, one generator cooling rack and one small cooling cell.
- Place the generator in a way that there is enough room to pull out the fuel rod
- Also make sure there is an easy access to the socket board and to the coolant cells.
- The generator parts need to be bolted together and the generator needs to be bolted to the ship.
- Generator cooling can also provided by using Radiator

Propellant
Thrusters need and consume propellant to work. Propellant is stored in propellant containers. The amount of containers spaceship will need depends on how many thrusters it has.
- There are three sizes of propellant containers: small, medium and large.
- While placing the propellant containers make sure there is an access to at least two of the sockets found in the tank support.
- The propellant container needs to be bolted to the ship.
Data Network
The spaceship needs a cable network to transfer electricity to all the machinery and data between all the devices.
- Use the cabling tool to connect all the machinery and devices to the same network.
- Make sure that all the devices and machinery: thrusters, doors, MCU, FCU, levers, lamps and buttons are connected to the network.


Pipe Network For Propellant
The spaceship needs a pipe network to transfer propellant to all thrusters from propellant containers.
- Use Pipe tool to connect all propellant containers and hardpoints with thrusters.
- To get information from propellant network, containers also need to be in electricity network. Connecting one propellant container support to electricity network can be used to show the total amount of propellant in the pipe network.


Ship Controls And Basic Configuration
Spaceship thrusters can be controlled directly with levers, buttons and YOLOL. However YOLOL-configured thruster balance settings and flying are very ship specific configurations. The following guide explains how to use and configure Flight Control Unit (FCU) and Main Flight Computer (MFC) to do thruster balance calculations and settings for you.
- If you are interested about YOLOL configured thruster balance settings and flying you can examine Spaceship Vasama in the Spaceship Designer.
Flight Control Unit (FCU)
- The FCU gets input from control devices (levers and buttons) and sends it to the Main Flight Computer, which forwards it to the thrusters.
- The arrows on top of the FCU define the ”forward” direction of the ship.
- There can be more than one FCU connected to one Main Flight Computer.
- There are currently three FCU models in Starbase: Basic, Advanced and Premium model. Each model has a different set of ship movements available.
Basic model:
- FcuMfcIO (for connecting the MFC)
- FcuInputRange (Lever input range)
- FcuGeneralMultiplier (a "soft power switch", scales all output)
- FcuForward (moves the ship straight forward or combines FcuFwdBwd rotations with the forward movement)
- FcuBackward (moves the ship straight backward or combines FcuFwdBwd rotations with the backward movement)
- FcuRotationalPitch (in-place pitch rotation)
- FcuRotationalYaw (in-place yaw rotation)
- FcuRotationalRoll (in-place roll rotation)
Advanced model (in addition to the Basic controls):
- FcuUpDown (moves the ship straight up or down)
- FcuRightLeft (moves the ship straight right or left)
Premium model (in addition to the Advanced controls):
- FcuFwdBwdPitch (rotation combined to forward/backward movement)
- FcuFwdBwdYaw (rotation combined to forward/backward movement)
- FcuFwdBwdRoll (rotation combined to forward/backward movement)

Main Flight Computer (MFC)
- MFC is placed in the same data network with a Flight Control Unit and thrusters. The MFC and FCU share one identical device field name.
- MFC gets input from the Flight Control Unit and sends this data to the thrusters, telling them what to do. For example "pilot interacts with yaw lever". The FCU receives the information and sends it to the Main Flight Computer. The MFC then automatically decides which thursters are used to make the ship yaw.
- Each thruster group is controlled by exactly one MFC. There can be several MFCs in one ship.
Levers
The Flight Control Unit (FCU) gets input from control devices like levers and buttons. To get the levers to work with an FCU you need to configure the lever device fields to match with the FCU device fields (see picture below).
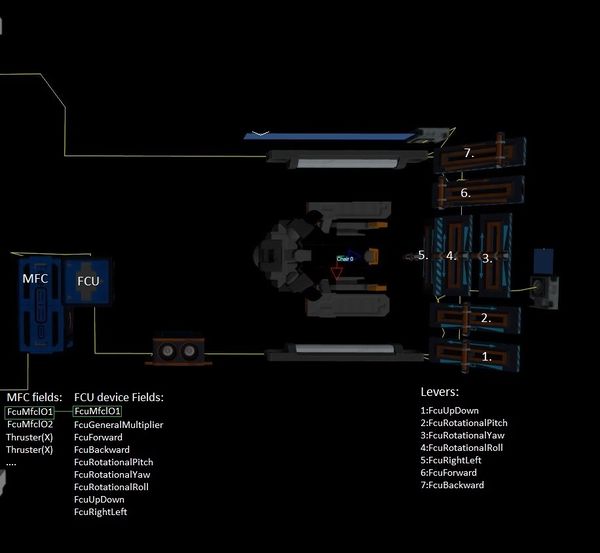
Examine FCU device fields and levers. Also notice matching device fields in the MFC and the FCU

Lever Examples
Note! These are examples for a ship that has an FCU and an MFC. Also the FCU input Range is set to 100.
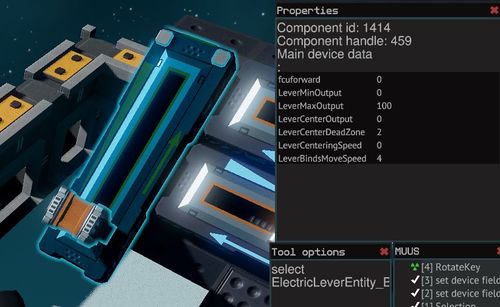
Lever settings for forward thrust. If the FCU input range would be 1000, then LeverMaxOutput would be 1000 and LeverBindsMoveSpeed would be also higher
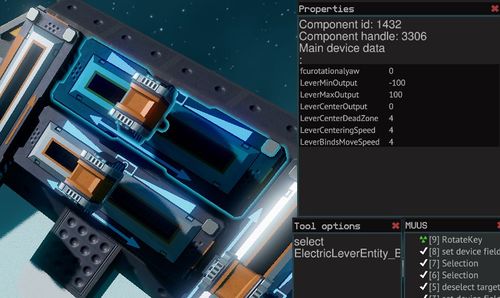
Centered lever settings for yaw. Notice LeverCenteringSpeed.


Thruster configuration
The Main Flight Computer controls the thrusters. One MFC can handle 50 thrusters, which means there are 50 device fields for thrusters in an MFC (thrusterPowerLevelXX). These field names are set for ship's thrusters. Field names can be renamed but each thruster should have a unique device field name (excluding stacked triangle thrusters).
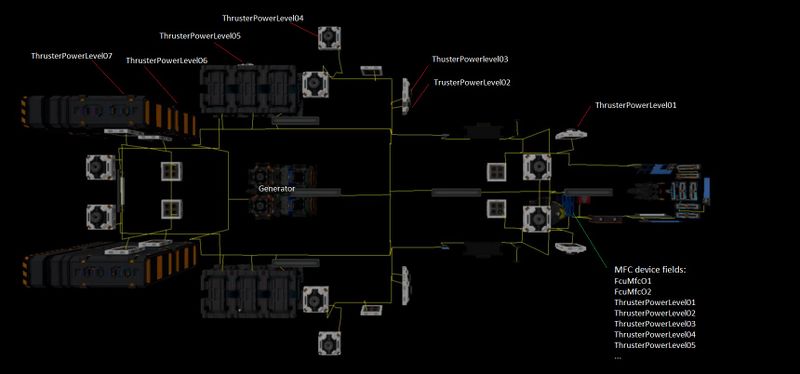
Examine the MFC device fields (thrusterpowerlevel...) and thruster device field names set to thrusters throughout the data network
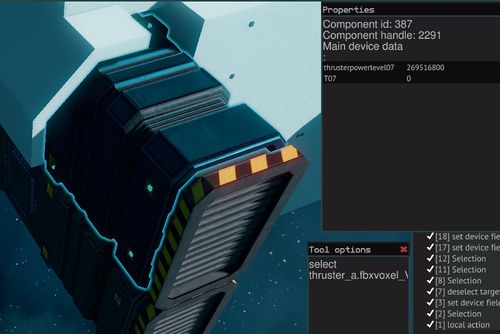
A configured thruster: When a thruster is connected to same data network with an MFC and is given matching field name with the MFC thruster list, the values should automatically update and be the same. Also in this case ThrusterCurrentThrust field name has been changed to T07 ( This can be linked to Progress Bar)

Troubleshooting
Checklist
Each spaceship needs the following things to fly:
- Valid frame/Hull
- Thrusters
- Powersource
- Propellant for thrusters
- Data Network
- Pipe network for propellant
- Ship controls and basic configuration
My ship is not moving?
- Check durability and bolting→ Thruster hardpoints are bolted to the frame and thrusters are bolted to the hardpoints/ hull. The ship frame is consistent and bolted.
- Thrusters need electricity and propellant → Check cabling and piping (all thruster hardpoints are connected to the electricity network and to the propellant pipe network.
- Electricity network (cable) is connected to the generator. Check that the generator has all the necessary parts → see 3. Powersource/generator
- Pipe network is connected to the propellant containers → see Pipe network for propellant
- Check the thruster configuration → see thruster configuration (matching device field names and values in MFC and in thrusters (If the ship is using an MFC)
- Check matching device field names in the MFC and FCU → see picture in Levers section
- Check matching device field names in the levers and in the FCU → see picture in Levers section
When I start flying my ship, some pieces of the ship detach?
- Use the Durability Tool. Check that everything is green and bolted.
My ship is almost symmetrical but still doesn’t fly straight/ turns easier to one direction?
- Some thrusters might not be working → Check : 1 , 2, 3, 4 ,5
All thrusters seem to working but ship yaw/pitch/roll is slow?
- In some cases you might need re-position thrusters or add more thrusters. Upgrading FCU to premium model which has combined movements possibilities can also be helpful in some cases.